


A reliable UX workflow helps UX teams minimize mistakes, save resources, and create user-centric products by outlining a clear, consistent, step-by-step UX design process for creating impactful products.
In this article, we’ll explain why UX workflows are so crucial for creating experiences your users will love, and guide you through the eight steps of creating your own streamlined UX workflow.


Why do you need a UX workflow in UX design?
A UX workflow provides your team with a systematic process for creating intuitive user experiences and completing UX design projects. With an effective UX workflow, you can organize your team, establish UX design objectives, and see the process through—from determining project scope to hand-off.
Some of the main benefits of establishing a UX workflow are:
- Enhanced collaboration: A clear UX workflow process outlines design processes, making it easier for team members to effectively communicate, establish roles, and delegate tasks
- Streamlined and efficient processes: A robust UX workflow makes it easier to move through the design process while reducing cost, shortening the project timeline, and saving resources
- Reduced risk of project failure: A comprehensive process will involve UX research and digital product reiteration, allowing your team to detect and identify issues early on
- Better UX that satisfies your users: You’ll have the structure you need to thoroughly research user needs and implement them in your product design and development process—resulting in a more intuitive user experience, user interface, and increased user satisfaction
Let’s look at how you can build a comprehensive UX workflow that will help you delight your users and win over your stakeholders.
The 8 stages for building a structured UX workflow
From design thinking to agile development, it only takes one Google to discover there’s a whole range of different UX frameworks and workflows out there. While UX workflow steps can and will differ, there are eight distinct phases that every UX workflow should have in common—even if their naming and order varies slightly.
- Definition
- Research
- Analysis
- Design & prototyping
- Testing
- Iteration
- Hand-off
- Launch
Whatever naming or order your process takes, an effective UX workflow helps structure and standardize how you turn ideas into fully-functional designs.
Defining the process itself will look different depending on unique factors within your organization. To begin planning yours, here are some main considerations:
- Stakeholder objectives: Your UX workflow, and research operations as a whole, should align UX research with business objectives
- Available resources: Work with what you have—to be effective, a UX workflow should be realistic, so ensure it’s designed around your available UX resources
- Product complexity: UX workflows differ depending on the complexity of your product—meaning some are relatively simple and others are more complex
We’ve outlined the key stages of a UX workflow with the help of industry expert Haley Stracher, UX/UI Designer and CEO of Iris Design Collaborative. Throughout these stages, we include a rolling example that demonstrates each stage in action with a UX research, design, and development scenario.
1. Needs, goals, and project scope definition
UX research and design is about solving user problems. But before you can focus on your users, you’ll need to align your efforts with broader business goals. In this initial step, you’re defining stakeholder needs, your project’s goals, and its scope. This makes organizing your project easy while ensuring all team players are on the same page.
This phase of the UX workflow is about understanding the landscape in which your UX workflow will exist. You’ll be planning, coordinating, and pulling together information from team members, stakeholders, and professionals from other departments.
Sounds like a lot on your plate? No stress.
Here’s a checklist of some of the main information you need to define and document during your UX workflow’s initial planning phase:
☑️ Business objectives: Document wider business and stakeholder goals and crucial key performance indicators (KPIs) for defining project success
☑️ Stakeholders and team members: List who will be participating in the project, including stakeholders, team members, and colleagues in other departments
☑️ Project scope: Define deliverables, timelines, budget, and project boundaries to organize your project and ensure everyone is on the same page
This first step of your UX workflow can also give you a head start in defining your user needs. If you have a UX research repository, pull out relevant insights that can inform the process, and combine feedback with your UX research in the next step of the process.
When outlining scope, Haley emphasizes balancing wider business objectives and user needs:
“Balancing stakeholder needs and user needs can be very challenging. For example, you may not want to ‘annoy’ or ‘overwhelm’ your users with certain features, however, they’re necessary for data collection or stakeholder needs to fundraise. So, it’s important to integrate these tastefully and find a happy medium between the two.”
📋 Follow the example
You’re a product manager for a learning management system called Learn&Go. After speaking to stakeholders, you’re told many users abandon the platform shortly after signing up.
Your business objective is to increase retention. During this first stage of your UX workflow, you create a document listing stakeholders, your UX team, budget, and timeline.
2. UX research process design and methodologies
Another key consideration for your UX workflow is how you’ll go about uncovering insights—your UX research process and methodologies. You need to consider your resources and how you can organize them to conduct UX research.
A good UX workflow includes UX research studies throughout the product design and development process. User research is crucial for understanding user pain points and needs, and developing products users love. That’s why adequate UX research is a must—it enables you to build a UX workflow that has the resources to consistently deliver great products.
There are many research methods to include in your UX workflow—from user interviews and UX surveys, to card sorting and tree testing, usability tests to prototype testing. You can also look at product analytics for information on product engagement and usage. These methods can and will be used at different stages of the UX design process, and help ensure you’re making decisions based on user feedback and data.
Haley states that UX research is crucial for building user personas, understanding users, and ultimately creating a platform users will love:
“UX research plays a huge role in mapping out user journeys. Market research and persona research are critical to understanding the positioning of your platform as well as integrating psychology into the UX flows, so your persona feels welcomed into the platform.”
At this stage of your UX workflow, you’re looking to employ research methods that uncover the most pressing problems or blockers users encounter. This will inform you going forward in how to meet broader business objectives.
Where are users most dissatisfied? Do they find the onboarding process confusing? Is navigating your website almost as frustrating as the problem they’re seeking to solve in the first place?
📋 Follow the example
To understand why users are dropping off after signing up, you’ve decided to conduct UX surveys—using a UX research platform like Maze—to reach a large number of users at once.
You ask a mix of closed-ended and open-ended research questions like:
- How satisfied are you with Learn&Go?
- What are some ways we could improve the Learn&Go platform?
- Are you able to find what you’re looking for on Learn&Go?
- What would you change, if anything, about Learn&Go’s onboarding process?
With the creation and distribution of this survey, your initial research is underway.
3. Data analysis and insights identification
Next up in any UX workflow is data analysis. By this point, you’ve conducted initial UX research and need to uncover the insights your data has collected. The exact steps for UX research data analysis depends on the type of research you’ve conducted, and the type of data you’ve collected.
If you’ve collected quantitative data, you’ll be analyzing data using quantitative methods like mathematical interpretation and statistics. If the data you’ve got is qualitative, thematic analysis and affinity mapping will be more useful. Regardless of which you choose, knowing how you’ll approach each type of data is crucial for a streamlined UX workflow.
After analysis, you can use these insights to create and define:
- User personas: Fictional character bios that reflect a market segment of your potential users. A complete user persona will have clearly defined personality traits, motivation, demographic information, and frustrations.
- Empathy maps: A collaborative visualization tool depicting what the user says, feels, does, and thinks about a product experience.
- Journey maps: Also known as user journey flows, these UX diagrams depict the steps users take when engaging with a product. They include clearly-defined touchpoints reflecting goals, feelings, and pain points.
- User product problems: Refers to specific issues users encounter while engaging with your product. You’ll dedicate the rest of your design process to solving a single user problem.
Analysis is time-consuming. While you can do it manually, a UX research tool will streamline the process of turning raw, unusable data into actionable insights that inform your every design decision. With Maze, you can conduct interviews and instantly analyze the results for user sentiment and rich, descriptive feedback.
📋 Follow the example
With the help of Maze’s automated reporting and AI analysis capabilities, you’ve rapidly analyzed results for both survey questions. The insights are eye-opening—over 67% of interviewed users find your platform difficult to navigate and can’t find course information easily. Out of the open-ended answers, you’ve noticed a trend in users wishing for a centralized area where they can review their performance.
It’s a perfect solution: a personalized profile dashboard would make user navigation more intuitive.
Time to go back to the drawing board!
4. User flow, wireframe, and prototype development
With the insights you’ve gained from analyzing your UX research data, you’re ready to begin designing UIs or specific product features. Completing this step in your UX workflow depends on how far you are in the product development process.
It’s during this stage of a UX workflow that you create designs based on your research. You want to outline your design process, including timelines and teams. This is difficult to predict, as different projects require different actions. Some key considerations for the design stage of your UX workflow include:
- Team: Who’s involved in the project? Who is responsible for what? Which roles are involved in your UX design process?
- Design process: What is your process for turning insights into products? When will you next test your designs?
- Decision-makers: Who makes the key design decisions? Who has the final say on design aspects?
- Documenting: How will you document your research and design efforts? What key documents do you need for the design process?
Some of the deliverables you can expect to develop at this stage include:
- User flows: Diagrams mapping out steps users would take to navigate through your product to meet their specific objective. Typically, design teams create user flows after they’ve validated a product or feature concept through research.
- Wireframes: A wireframe is a low-fidelity sketch of your product with basic design elements and patterns. Typically created at the beginning of the design process, it includes layout elements such as information architecture, content, interactive links, and navigation.
- Prototypes: A prototype is the simulation of your design. Types of prototype can be low-, mid-, or high-fidelity, depending on how closely it will resemble the final product. Prototypes can be interactive and simulate user interactions by linking components and UIs together.
📋 Follow the example
Together with your design team, you begin creating user flows and wireframes for personalized profile dashboards. You don’t make them too detailed in the beginning—you include basic information like enrolled courses, homework, a search bar, and progress bars. Now, it’s time to take it to users for a test run.
5. Test and test again
We previously highlighted that UX research is a crucial elements throughout the entire UX workflow. In the initial phases, it serves to help define your target audience and user problems. In later phases, it helps you validate ideas and gain feedback on your mockups and prototypes. You’ll use this feedback to refine your design until it perfectly matches user needs.
Testing your designs before they go into full development ensures you’re not developing designs nobody wants to use. It’s one of the crucial benefits of investing in UX research, and a key part of any effective UX workflow.
You can use many UX research methods to test whether your design is headed in the right direction, but usability testing methods are typically your go-to for testing design prototypes and wireframes. You can also conduct user interviews and surveys, as these help generate qualitative data to complement the quantitative data you uncover with usability testing.
💡 Testing tip: Can’t decide between two design elements or UIs in your journey, wireframe, or prototype? A/B usability testing lets you test two variations of the same design and then pursue the one your users prefer.
📋 Follow the example
With your new low-fidelity prototype ready for testing, you conduct a usability test. You ask users to find the courses they’re enrolled in from the dashboard. They’re able to find some of them, but not all of them.
Many of your testers are enrolled in several courses, but the dashboard only has enough space to display three at a time and there’s no clear way to access the rest. Users need a clear overview of their courses and a way to click through to see all courses. One user in an interview also mentions pre-filled search suggestions based on recent course activity. You add this to your feature request backlog to come back to.
6. Design iteration and final touches
This is where your UX workflow might flit back and forth between designing and testing. Creating stellar products and user experiences requires constant testing, iterating, testing, analysis, iterating again.
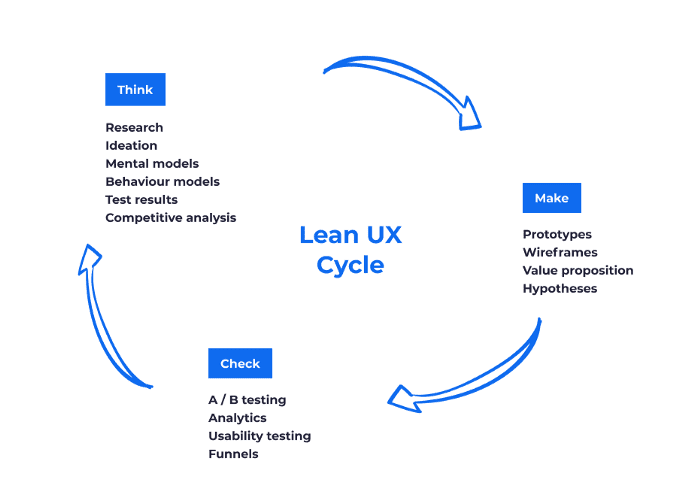
Think of this as a smaller, cyclical process within the larger UX workflow. Ensure your UX workflow includes a specific process for iterating your designs based on user feedback. This might be lean UX or the double diamond—there’s a whole range of UX frameworks out there.
The process of designing, testing, and iterating is the core principle of lean UX. This approach acknowledges that first product mockups will always fail to deliver user needs. Instead, design teams create a prototype, focus on getting feedback, and then make changes based on insights.

After you’ve identified specific friction points through further testing, you can implement potential solutions into your design. For user flows or wireframes, this might be changing the information architecture to fit users’ intuitions and expectations (known as mental models).
Data-backed iterations drive your design forward from low-fidelity basic user flows to high-fidelity, interactive prototypes.
Once you’ve got your insights, it’s crucial to structure and categorize them efficiently, to ensure nothing is missed. Techniques like affinity diagrams can help organize your data, and you can utilize software like Dovetail or project management platforms to keep track of every piece of data.
I use analytics to first understand and dissect the feedback, from there I create tickets in a project management platform for each piece of feedback and then prioritize!
Haley Stracher
UX/UI Designer and CEO of Iris Design Collaborative
Share
📋 Follow the example
After feedback from testing, you go turn your low-fidelity prototype and into an adaptive design element. The dashboard becomes larger or smaller depending on the information presented—and a horizontal scroll feature appears when a user is enrolled in more than six courses. You also add a button to ‘See all courses’ so users can easily access a complete page with all course information.
At this point, you also include a functional search bar. Your prototype is gradually looking more and more finished. You send out your developed prototype for testing and discover users have issues with the order of search results. You iterate the search function, perfecting it until users are happy.
7. Design hand-off and development
This is the final stage in your UX workflow. It’s where you establish how you’ll handle distributing findings with other departments. Sometimes this is to inform them of your work, or it may be because they’re the next step in the process—the development team, for example.
The hand-off is a finishing stage, but preparation starts earlier within the design workflow. When you establish how you’ll be documenting your research, insights, and designs—as we discussed in Step 2—you’re doing it to facilitate this stage of the UX workflow.
Here’s a checklist of some deliverables you need to develop for this stage of the UX workflow:
☑️ Design documentation and notes: A PDF document of the design, explaining key elements, making it understandable for developers
☑️ Mockups, wireframes, and prototypes: Showing the general layout and functionality of the design
☑️ User flow diagrams: To help developers understand the sequence and path users will take through the finalized product
☑️ Asset files: Containing all the visual assets you’ve collected through the workflow like logos, icons, images, and more
☑️ Accessibility guidelines: To help developers understand and apply accessibility standards throughout the development process
☑️ Project hand-off document: A detailed summary explaining the project scope as well as any contextual information designers need to know for a smooth development process
Keep in mind that each developer team may have different needs depending on your organizational policies and product. Keep in contact with your development team throughout your UX workflow and ask what they’ll need for a smooth hand-off to minimize delays.
You should also conduct visual design hygiene to ensure your assets, files, and designs are neat, making them easy for your development team to use. Some visual design hygiene best practices are:
- Grouping and naming your files based on UI functions
- Using a standard naming protocol for files
- Deleting all unused layers in your design
- Only hand off files that developers will need
Haley emphasizes design hand-off as a collaborative effort between developers and designers:
“Design hand-off is a collaborative effort. There’s a lot of progress with Figma and other UI/UX design systems to improve hand-off, but typically detailed and thorough notes, as well as screen-by-screen interaction, are the best way to show developers the exact interaction. It’s also essential to have regular scheduled meetings with development teams to ensure everyone’s understanding, then following up through project management tickets for each item you’ve sent to developers.”
📋 Follow the example
Congratulations! After five rounds of usability testing, you’ve perfected the Learn&Go dashboard. You’re ready to hand off your design to the development team for launch. You’ve included comprehensive documentation and an in-depth report to summarize the design and make the process smoother. All that’s left now is for the development team to bring the design to life.
They seamlessly develop and deploy the solution you’ve created, and the optimized design is live in Learn&Go.
8. Post-launch analysis and reporting
Okay, we told a white-lie. This is the final part of any good UX workflow: analyzing and reporting on your success—both in terms of user satisfaction, and the goals you set before commencing your UX research project.
You won’t be able to assess success straight away. You need to let enough time pass for users to adjust to new designs, and even more time before you can begin assessing business and UX research impact. Nonetheless, preparing a standardized approach to monitoring the success of your UX projects is a key part of your UX workflow.
📋 Follow the example
Once your update dashboard has been live for a month, you connect with users to discuss their thoughts on it. Ideally, you connect with the same users you surveyed previously. Tools like Maze Panel and Reach enable you to build your own participant management system to facilitate just that.
You ask them similar questions to the ones you did at the very beginning of this process. You then compare them to previous answers and find they have significantly fewer issues when it comes to navigating the Learn&Go platform.
Six months after the dashboard redesign, you check in on retention metrics to find that user retention has increased by 10%. This is a huge win—congrats!
Breeze through your UX research workflow with Maze
Having an effective UX workflow ensures your UX research projects follow a standardized, structured approach. It’s the difference between messy, disorganized research projects and seamless studies that help you create better products and user experiences.
Throughout a UX workflow, you’ll need to conduct multiple rounds of UX research. That’s where a tool like Maze helps, by streamlining your workflow so you can create better designs faster.
Maze is a leading user research platform that enables you to understand what your users really think and feel about your designs. With Maze, you can conduct moderated and unmoderated testing and instantly analyze data for insights. It saves you both time and effort throughout your UX workflow while helping you make data-backed design decisions every step of the way.
Frequently asked questions about UX workflows
What are the five levels of the UX research process?
What are the five levels of the UX research process?
To obtain better insights and ultimately build user-centric designs, UX researchers frequently use a five-step UX research process:
- Empathize
- Define
- Ideate
- Prototype
- Test
How do I create a UX workflow?
How do I create a UX workflow?
Creating a UX workflow requires defining your approach to each stage of the UX research, design, and development process. This includes outlining your organization’s approach to:
- Needs, goals, and project scope definition
- UX research process design and methodologies
- Data analysis and insight identification
- User flow, wireframe, and prototype development
- Testing, testing, and more testing
- Design iteration and final touches
- Design hand off and development
- Post-launch analysis and reporting
What is a UX design workflow diagram?
What is a UX design workflow diagram?
A UX design workflow diagram visually represents the steps to complete a user experience design project. It typically includes various stages of the design process and tasks associated with each stage.