


When you're designing for a user you barely know, it's easy to make assumptions about how they think and feel—we all do it, but assumptions are a slippery slope leading to flawed products.
An empathy map can help bridge this gap. It's a visual tool that lets designers step into their users' shoes, capturing their experiences, preferences, pain points, and behaviors. The result? Designs that resonate, solutions that solve real problems, and genuinely satisfied users.
In this article, we give you actionable steps to create a powerful customer experience empathy map, complete with a free downloadable template to get you started.
What does an empathy map look like?
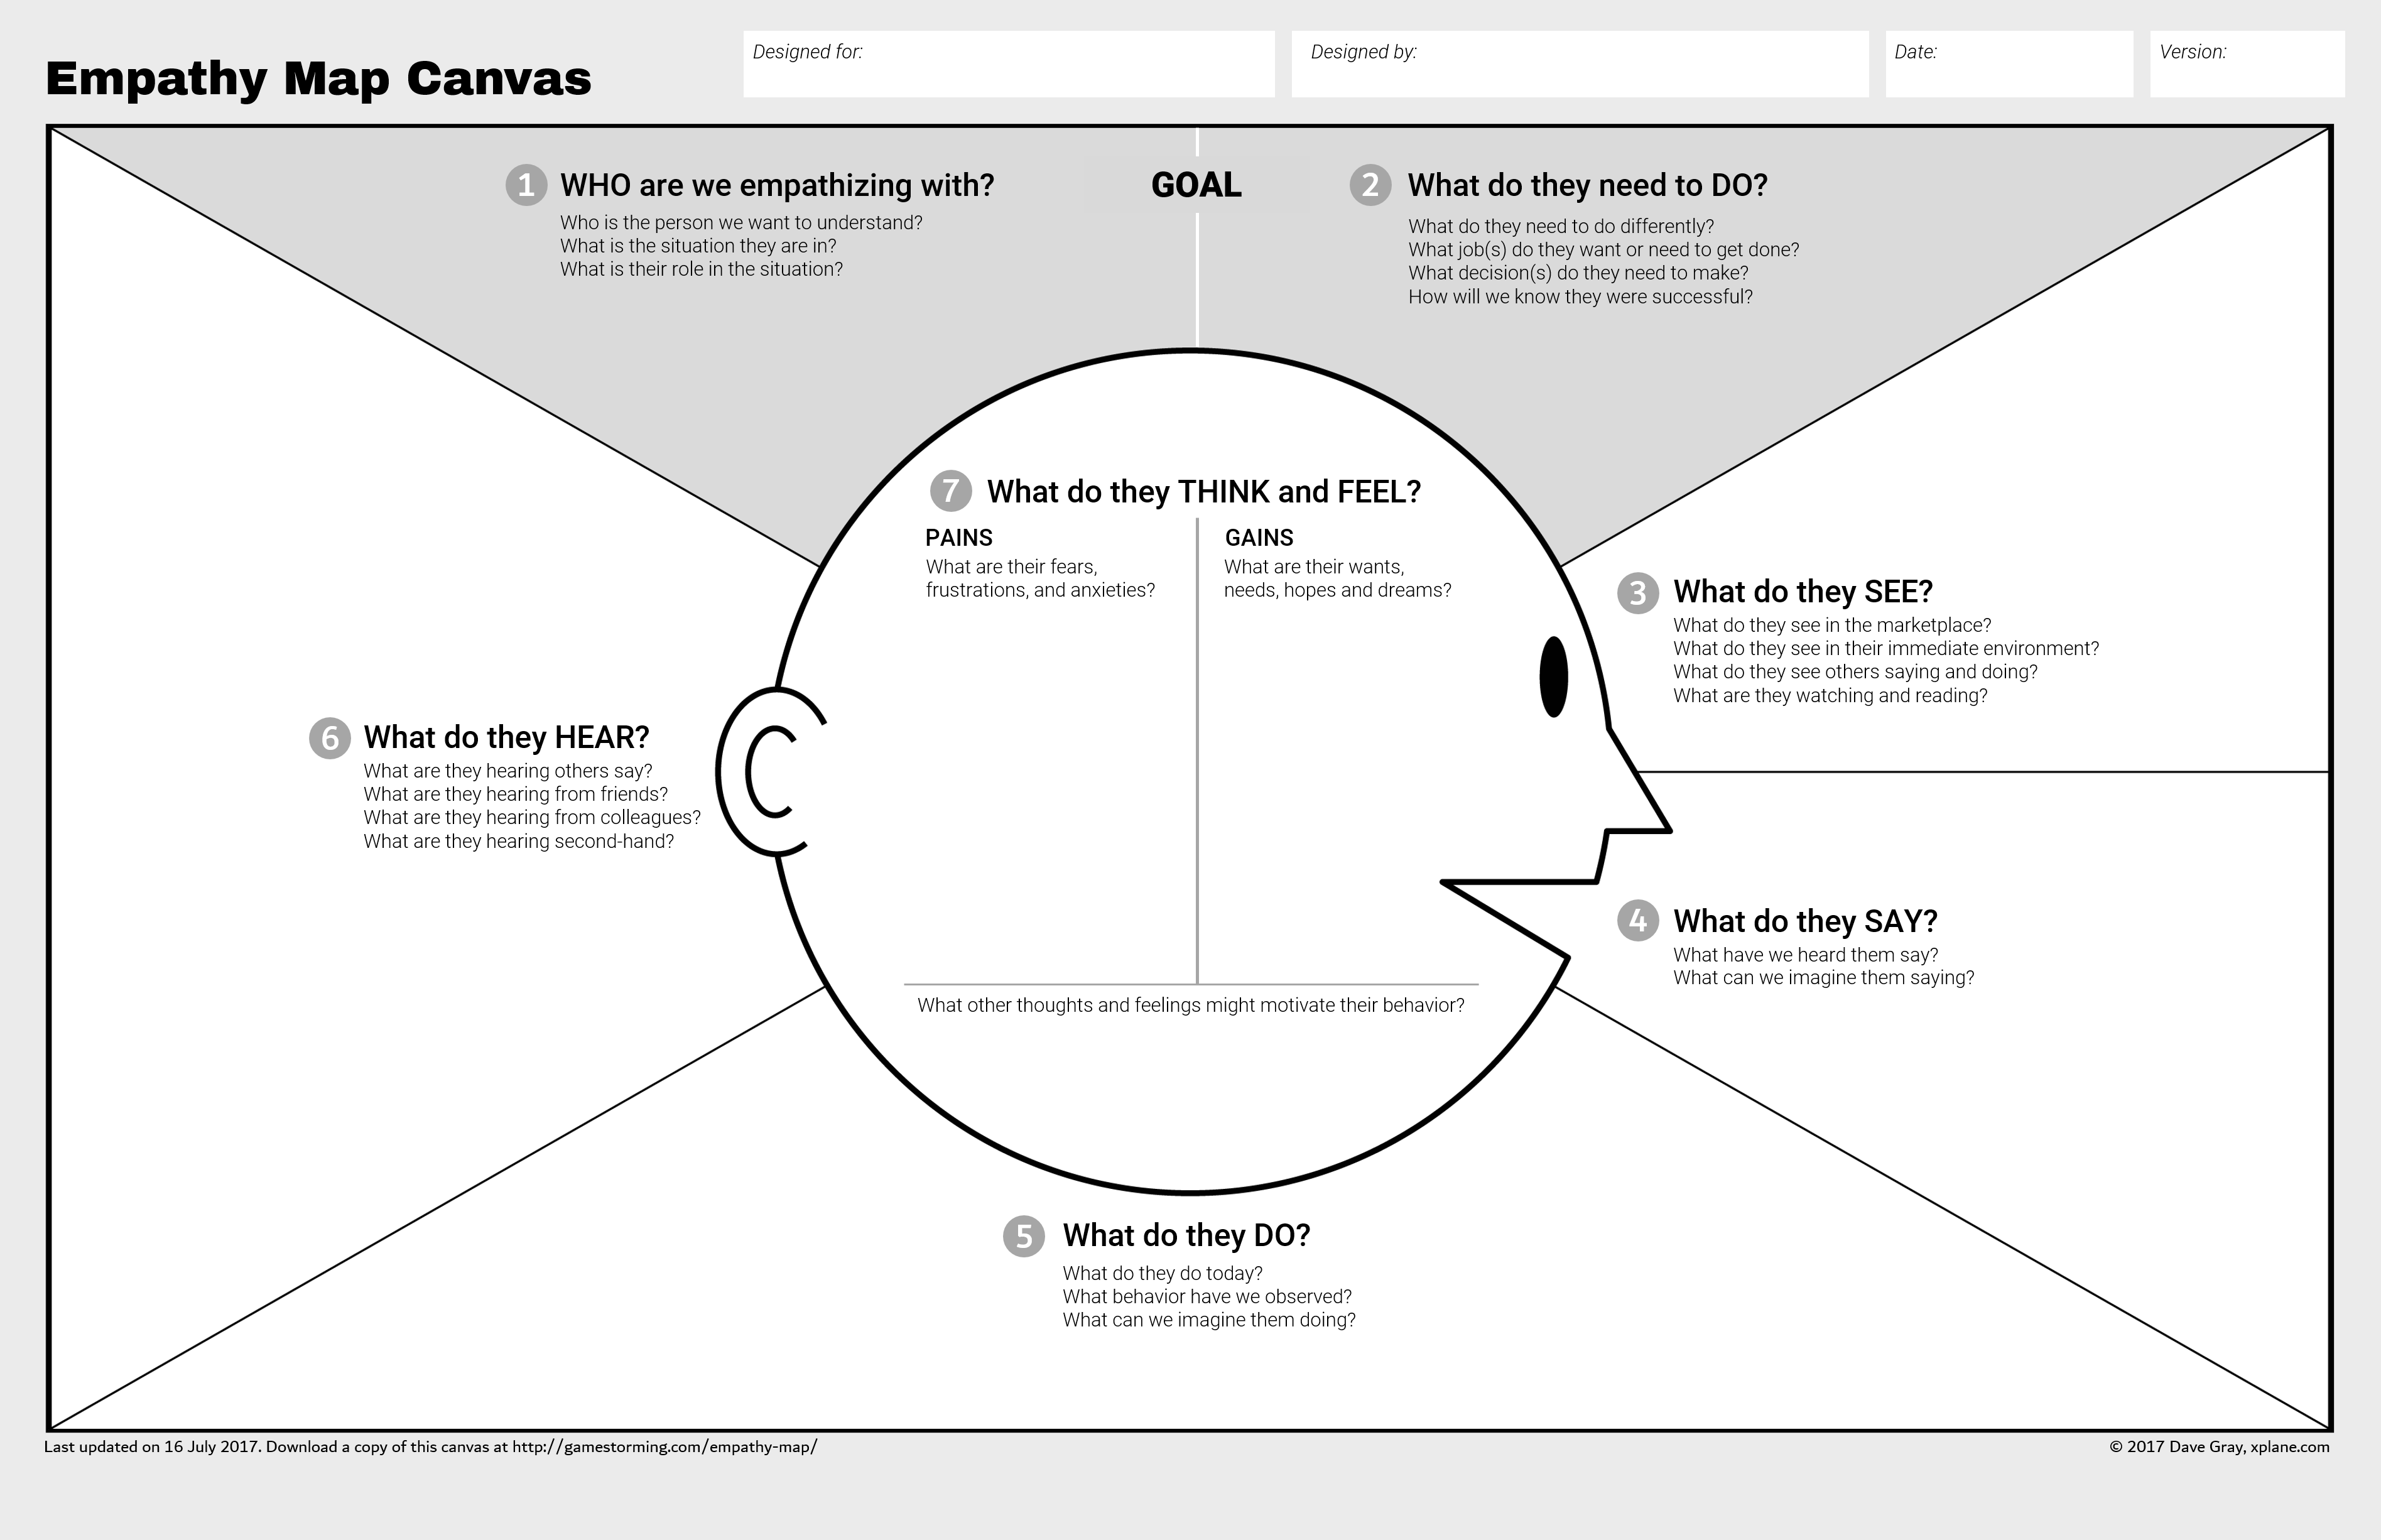
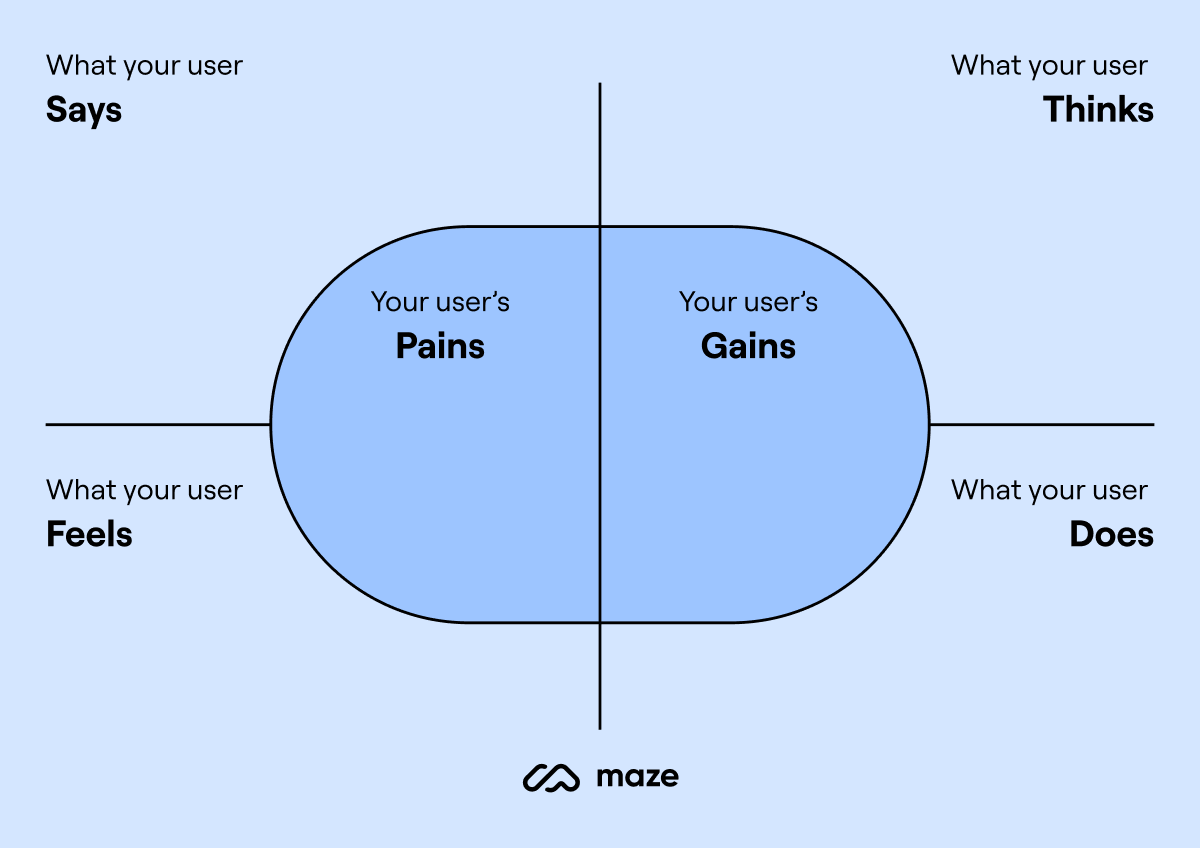
Updated Empathy Map Canvas ©2017 David Grey Photo credit: David Gray, Gamestorming, Empathy Map Canvas
The empathy map was originally developed by Scott Matthews in 2010, to help teams better understand their users. It then gained awareness and popularity when introduced in Dave Gray's book Gamestorming. The canvas is divided into four quadrants, with a central space representing the user.
The four main sections of the empathy map reflect what the user:
1. Says: This quadrant captures verbatim quotes from the user during user interviews or usability tests. It's what the user expresses out loud, providing direct insights into their thoughts and feelings.
2. Thinks: This section represents what the user might be thinking but not explicitly saying. It's about inferring the user's beliefs, concerns, and aspirations based on their behavior and other cues (e.g., clickstream data, UX surveys, facial expressions).
3. Does: This area focuses on the user's actions and behaviors, specifically their interactions within the product. It examines what they do, how they do it, their habits within the product, and patterns in their decision-making.
4. Feels: The last quadrant explores the user's emotional state. It captures feelings through surveys, in-app feedback mechanisms (like star rating scales or emoticons), and by analyzing their behavior (e.g., time spent on tasks, frustration clicks).
Gray's updated version from 2017 adds two more sections:
- Pains: This section identifies the user's frustrations, fears, and obstacles they face in achieving their goals
- Gains: This area highlights what the user wants to achieve, their needs, and how they measure success
When you populate these quadrants with insights, UX teams can build a complete picture of your users. This leads to more informed, user-centered design decisions.
Aggregated empathy maps


While individual empathy maps offer deep insights into specific users, aggregated empathy maps work the same but feature data from multiple users, helping teams understand overarching trends and make design decisions based on a wider user base.
They're particularly useful for:
- Prioritizing features that address common pain points
- Identifying opportunities that cater to diverse user needs
- Informing high-level product strategy and roadmap planning
Why do you need an empathy map?
Lucas Botzen, CEO at Rivermate, believes that empathy mapping is a mindset that can help us all stay closer to our users.
“At Rivermate, we’ve seen firsthand how empathy mapping impacts all of our product development and helps create meaningful user experiences. Understanding users in this multidimensional way gives us immense insights that can really drive innovation or success in ways we wouldn't have thought of ourselves.” — Lucas Botzen, CEO at Rivermate
So what are the benefits of empathy mapping?
Empathy maps help you:
- Bridge the gap between data and design: While quantitative data tells you what users do, empathy maps help you understand why they do it. For example, usage statistics might show low engagement with a feature, but an empathy map could reveal that users find it confusing or intimidating.
- Prioritize effectively: Empathy maps help teams distinguish between user ‘nice-to-haves’ and genuine needs. You might realize that adding new features is less important than simplifying existing ones, based on user frustrations revealed in the map.
- Identify hidden insights: Some UX research methods reveal clear-cut insights, while others require a little digging. Empathy maps can help connect dots between actions and opinions—such as users saying they value simplicity, but their actions show they prefer feature-rich products, highlighting a disconnect between stated preferences and actual behavior.
Empathy mapping is often confused with affinity mapping—but they’re far from the same thing.
When to use empathy maps?
So, where does empathy mapping fit into the UX design process? Generally speaking, the best time to create empathy maps is during the discovery stage of product development.
- Before research: Empathy maps help identify gaps in current user understanding and curate research questions
- During research: Use empathy maps as a framework for organizing observations and capturing insights in real-time, such as during user interviews or field studies
- After research: Raw data from user studies can used to communicate research findings to stakeholders and inform the creation of user personas
These are just some examples of when to create empathy maps, but the best time to use them is when you need to understand users. Here’s how Lucas uses empathy maps at Rivermate.
“We used empathy mapping at Rivermate to redraw and renew the onboarding process. We realized that new users were very overwhelmed by the initial setup. By putting ourselves in their shoes and learning what their frustrations and concerns were, we simplified the process and increased user retention by 20% in the first month.”
When should you not use empathy mapping?
The key to successful empathy mapping is having the time and participants to ensure your insights are coming from users, not hidden cognitive biases.
Lucas shares: “Empathy mapping isn’t ideal for cases when there’s limited user data or tight project timelines. If you’re limited on data or rushed, it can easily turn into mere assumptions—not informed decisions.”
Here are a few other cases where empathy maps may not work:
- For very broad or diverse user groups: Empathy maps work best when focused on a specific user persona or segment. They become less effective when trying to represent a highly diverse user base
- Highly technical or specialized products: For example, advanced engineering software used by aerospace engineers. The specialized workflows and technical requirements may be too complex for empathy maps to adequately capture.
- Need for more in-depth research methods: For example, a medical device requiring detailed understanding of user interactions and safety concerns would benefit more from ethnographic studies or usability testing than empathy mapping
Affinity mapping vs. empathy mapping: What’s the difference?
While both affinity mapping and empathy mapping support user-centered design, they serve distinct purposes and are used at different stages of the design process.
Empathy mapping focuses on understanding the user's perspective. It visualizes their thoughts, feelings, actions, and surroundings to build empathy. This helps designers create products and services that cater to user needs and frustrations.
Affinity maps (also called affinity diagrams) focus on organizing and analyzing large amounts of data. It helps identify patterns, trends, and themes within user research findings, user interviews, or brainstorming sessions. This process allows designers to synthesize information and extract actionable insights.
🤔 What about assumption mapping?
Another concept that sounds similar is assumption mapping, which involves systematically assessing the assumptions you make about your product and users.
7 Steps to create and use a customer experience empathy map
Here are the steps to create an empathy map for a deeper understanding of the user, leading to a better customer experience.
1. Set goals and expectations
First, focus your efforts so the empathy mapping exercise aligns with your overall UX research objectives and business objectives. Are you looking to improve a specific product, service, or touchpoint, or are you aiming for a broader understanding of your customers?
Identifying the target audience is also essential; determine which specific customer segment or persona you'll be mapping to ensure accurate and actionable insights.
2. Identify your target audience and recruit research participants
With clear goals you’re in a stronger position to identify and recruit research participants. Your empathy maps, generally speaking, should shine a light on an existing persona (although they can sometimes be used as a basis for building user personas if you’re starting from scratch). Your goals will relate to a specific persona or set of personas, and these are the profiles you’re looking to recruit for empathy mapping research.
User personas represent broad types of users, but it’s also crucial to consider the diverse profiles within each persona to ensure you’re building inclusive designs. Lucas recommends recruiting participants from diverse backgrounds for your research and testing:
“To ensure your empathy maps are inclusive, we make it a purposeful goal to get diverse users—and therefore, diverse opinions.
“We aim to recruit participants from varied walks of life, we incorporate accessibility tools and inclusive design techniques to ensure our products consider the differences in needs among our users.
“The more feedback we get from as many users as possible, the more real the reflection of our users is within the empathy map.”
✨ Pro tip
With Maze Panel, you can tap into over three million B2B and B2C participants in 150+ countries and improve response quality with custom screening. If you already have a testers database, use Maze Reach to engage your own community for meaningful insights.
3. Gather materials and conduct research
To create an empathy map, you'll need materials like a whiteboard, sticky notes, and markers. If you're working remotely, digital tools like Miro, Figma, or Sketch can be excellent alternatives for collaborative mapping.
The next step is to conduct UX research and gather the data to inform your empathy map. Conducting user research is a task in and of itself, but the best approach is mixed methods research. By combining qualitative and quantitative research methods, you’ll get a wide variety of data that can populate different quadrants of the empathy map.
For example, you could send out a user survey to gather quantitative data on how users are feeling about your product and its user experience. You can then follow up with interview studies to dig into the why behind survey responses. Alongside this user research, you can also look to product analytics for additional information that doesn’t come directly from the user.


4. Create and populate each quadrant in an empathy mapping session
Once you’ve gathered your user insights, separate them into the different quadrants of your empathy maps. Consider which quadrant each insight belongs to; what the user says, thinks, does, and feels.
You can create an empathy map for each of your user personas—just make sure you adequately manage data to ensure you’re crystal clear on which insights relate to which persona. A highly-organized research repository can help here.
5. Synthesize insights
After populating each quadrant of your empathy map, the next step is to synthesize the insights gathered. This process involves analyzing information to identify key patterns, contradictions, and actionable insights to inform your design decisions.
Focus on verbs that describe activities and desires, rather than nouns that might prematurely suggest solutions. This approach helps you stay open to various possibilities and avoid jumping to conclusions too quickly.
For example:
- Instead of noting ‘a calendar app’ (noun), focus on ‘scheduling and managing tasks’ (verbs)
- Instead of ‘a notification system,’ think about ‘staying informed and updated’
You should also look for contradictions within or between quadrants, which can reveal deeper insights and areas of tension that need to be addressed. These contradictions often highlight unmet needs or areas where the user experience can be improved.
For example:
- Within the Thinks and Does quadrants: Blake thinks that using multiple apps is inefficient, but they continue to use several apps to manage their tasks. This contradiction suggests a need for an integrated solution.
- Between the Feels and Says quadrants: Maria feels overwhelmed by complex interfaces, but she says she wants more features. This contradiction indicates a need for a balance between functionality and simplicity.
A varied mix of data will help you get deep insights to clarify any contradictions, and ensure your empathy maps are a true insight into user experiences.
6. Share and validate with stakeholders
This step is important because stakeholder buy-in ensures your insights will be used to inform product decision-making and drive user-centered design. Without stakeholder support, even the most insightful empathy map might be ignored or underutilized in the design process.
When presenting to stakeholders, start by explaining your methodology to establish credibility. Then, showcase the empathy map visually, highlighting key findings from each quadrant.
💡 Product tip
Use Maze’s Automated Reports to efficiently present clear, data-driven insights to stakeholders, making it easier to demonstrate the impact of UX research. Share reports directly via custom links, embed them in tools like FigJam, and engage in discussions through the built-in comments feature.
7. Use the empathy map to inform design
The ultimate goal of creating an empathy map is to inform and improve your design process. This final step is where you translate the insights gained from your empathy mapping exercise into actionable design decisions.
Lucas Botzen shares an example of how empathy mapping directly influenced product design at Rivermate, when the team was designing a new feature for managing remote employees:
"Empathy mapping showed that one of the users' major frustrations was disconnection and feeling unappreciated, which was part of a larger concern about being undervalued in the remote workspace.
“From here, we could shift our approach to features that build better team communication and recognition. It wilfully changed course, adding a virtual team-building tool and a system for recognition that improved user engagement and satisfaction dramatically."
3 Free downloadable empathy map templates
Building empathy maps doesn't have to be complicated. Here are three free templates to get your team started.
1. Maze's simple empathy map template for a quick user snapshot

Our free empathy map template offers a simple way to understand your users. By focusing on all six quadrants you can capture what users say, do, think, feel, and their pains and gains at various points in their experience. Working from the latest revision of the empathy map, paired with a clean visual design, you can gain a quick snapshot of their journey.
This straightforward, visual tool allows you to grasp user needs and frustrations at a glance, making it perfect for design sprints or brainstorming sessions.
👉 Start building user empathy within your team with Maze's downloadable template. Simply save the image above or download the empathy map template here.
2. Figma empathy map template

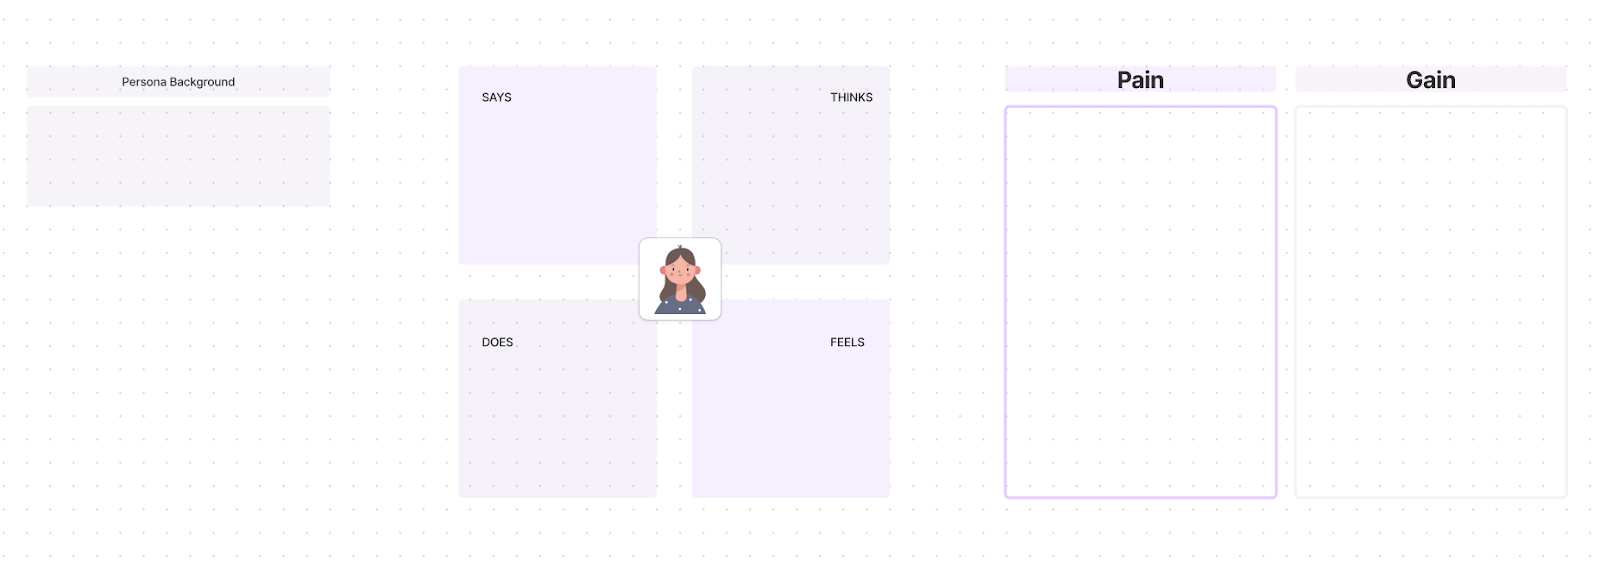
This empathy map template on Figma, designed by Henna Mohammed, is great if your team is already working in Figma and wants to keep documents centralized. The addition of a persona background spot offers a place for context and relevant links to user persona docs. While the visual design differs to a classic empathy map layout, this is a ready-to-use, virtual option for anyone looking to create empathy maps in Figma.
3. Miro’s free empathy map template to understand users

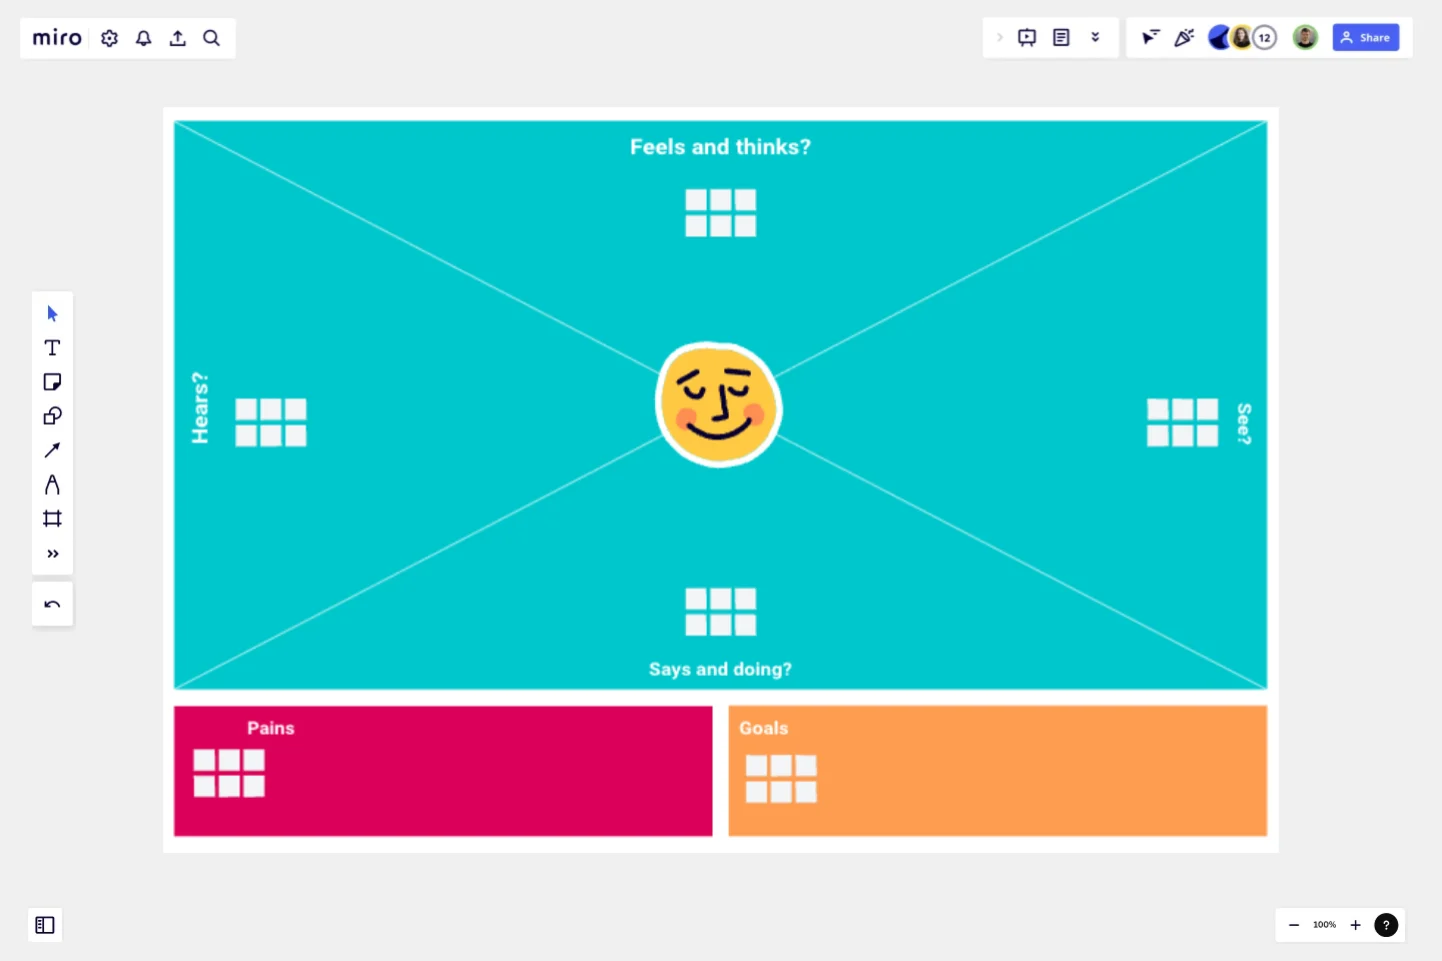
Miro’s ‘Feelings and Thoughts’ empathy map template can be adapted to any user research project. Miro’s twist on the traditional empathy mapping terms swaps gains for goals, and brings in visual observation by combining the says and does quadrants, and adding sees. This can be ideal when conducting research via more behavior-oriented methods, like guerrilla testing or field studies (ethnographic research).
Create user-centered designs with Maze
Empathy mapping is a powerful tool in a UX designer's toolkit. It offers a structured approach to understanding and visualizing user needs, behaviors, and emotions, helping bring design in line with user needs.
Ready to get started? Before you begin your empathy mapping process, you need those all-important user insights. A UX research tool like Maze can make the insight-gathering process a whole lot easier.
Maze is the user research platform that makes user insights available at the speed of product development. Bringing recruiting, conducting, analyzing, and reporting on UX research under one roof, Maze makes UX research easier for everyone involved—whether that’s researchers on the ground, or the C-Suite wanting a snapshot of user needs.

Frequently asked questions about empathy mapping
What’s the difference between empathy maps and user personas?
What’s the difference between empathy maps and user personas?
Empathy maps and user personas are both user research assets, but they serve different purposes. Empathy maps snapshot user experiences at a specific moment (feelings, thoughts, actions), while user personas are like detailed profiles of your typical user (goals, needs).
Is empathy mapping a replacement for journey mapping?
Is empathy mapping a replacement for journey mapping?
No, empathy maps and journey maps are not interchangeable. Empathy maps deep-dive into a user's specific experience (feelings, thoughts, etc.) at one touchpoint. Journey maps show the entire user experience across various touchpoints.
How do you integrate empathy maps into agile development cycles?
How do you integrate empathy maps into agile development cycles?
Use empathy maps to inform user stories during sprint planning, refine solutions in backlog refinement sessions, guide design and development decisions, and validate your finished product against user needs during testing.