


Chapter 2
Maze setup and integrations
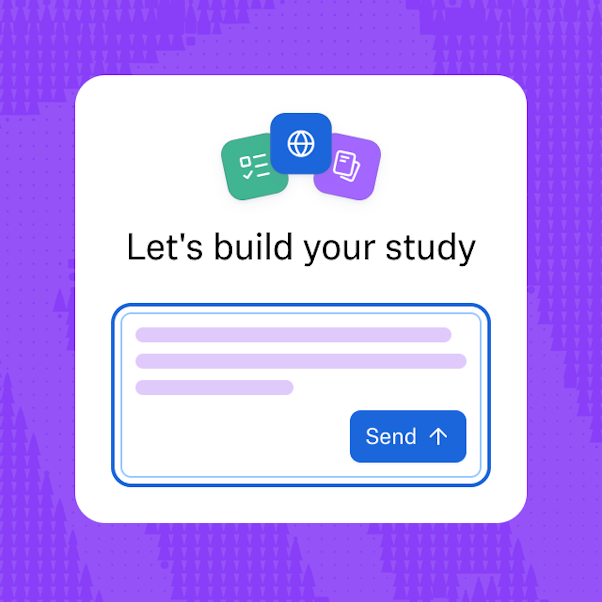
Before you run your first study, you’ll need to complete a short setup so Maze can connect to your product and tools. Don’t worry, this beginner-friendly tutorial makes it quick and easy to get started.
In this chapter, we'll cover:
- A quick onboarding checklist
- How to install the Maze snippet on your website
- How to connect Maze to Slack and other tools your team already uses
A quick onboarding checklist
Before diving into setup, make sure you have the following in place:
1. Account and access
- An active Maze account
- Admin or editor permissions in Maze
- Access to your company’s website or web app (or a developer who can help)
2. Website and technical access (optional)
- Ability to add a script to your website’s <head> tag
- Access to your CMS or codebase (or Google Tag Manager, if you use one)
- The domain(s) where you plan to run live website tests or in-product prompts
3. Team and tools
- Access to your Slack workspace (admin approval may be required)
- A clear idea of where your team wants research updates to land (e.g., a #research or #product-insights channel)
💡 If you’re not installing the snippet yourself, share this chapter with your developer early. The setup usually takes just a few minutes.
Installing the Maze snippet
The Maze snippet is a small piece of tracking code that connects your website to Maze. You’ll need to install it if you want to run live website testing and in-product prompts, such as a website test where you wish to collect heatmaps and goal-based success metrics. If you’re running continuous or in-product research, installing the Maze snippet upfront makes all research accessible from the get-go.
What the snippet does:
- Enables Maze to launch tests directly on your live site or prototype
- Allows you to trigger in-product prompts based on URLs and user behavior
- Ensures participant interactions—like clicks, paths, and session recordings—are tracked accurately
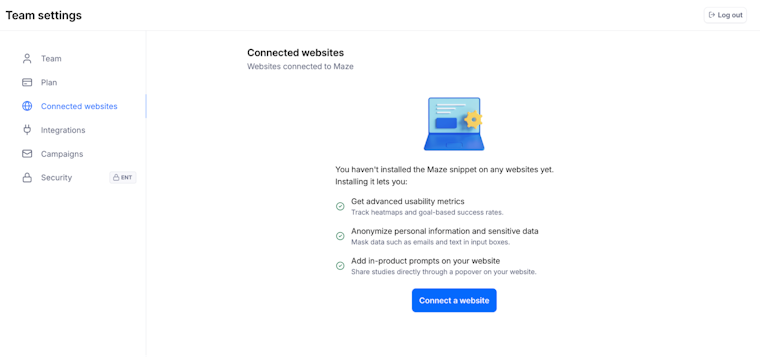
Where to find the snippet in Maze
- Select Settings from the bottom left panel
- Go to Team Settings from the dropdown
- Navigate to the Connected websites tab
- Click Connect a website (or Code snippet if you've already connected one)
- Copy your unique Maze snippet

💡 Everyone uses the same snippet code. All team members share one tracking code. Install it once on your website, and it automatically works for everyone's studies.
How to install the snippet
If you have access to your website code, here's how to add the Maze tracking snippet:
- Copy your snippet from the previous steps
- Open your website code (or access your CMS)
- Locate the <head> section in your site’s HTML
- Paste the Maze snippet immediately after the opening <head> tag
- Deploy your changes to make the code live on your site
- Return to Maze and click Verify to confirm the installation
Once verified, Maze will confirm that the snippet is live and working.


⚠️ The snippet must be installed on all pages where participants will navigate during a test, not just the homepage.
Alternative ways to setup the snippet
If you don’t have access to your website code, here are a few other ways to install the snippet:
- Developer-managed codebase: Share the snippet and installation instructions with your engineering team. Installation typically takes less than 10 minutes.
- Google Tag Manager: You can technically install the snippet through Google Tag Manager, but there are some potential issues to be aware of, like:
- Ad blockers: Popular ad block extensions block scripts loaded via GTM by default. This means some participants won't be able to complete your test.
- Reduced response rate: Participants may need to take extra steps (like disabling ad blockers) before the test loads.
- Consent banners: If you're using GTM to manage consent preferences, participants will need to click ‘Accept all’ (or specifically enable performance cookies) before the test loads. This adds friction and may reduce completion rates if users decline performance cookies or don't interact with your consent banner.
Common issues to watch for
Here are the most common problems that can prevent the snippet from working correctly:
- Snippet only on one page: The code needs to be on every page participants will visit during your test, not just your homepage
- Website not verified: Prompts and tests won't work until you click Verify in Team Settings and see the green checkmark
- Content Security Policy (CSP) blocking Maze: If your site has a CSP, you'll need to whitelist Maze domains so the snippet can load
- Multi-domain testing: If your test spans multiple domains (like website.com and dashboard.website.com), install the snippet on both
If verification fails, refresh the page and try again—most issues are quick fixes.
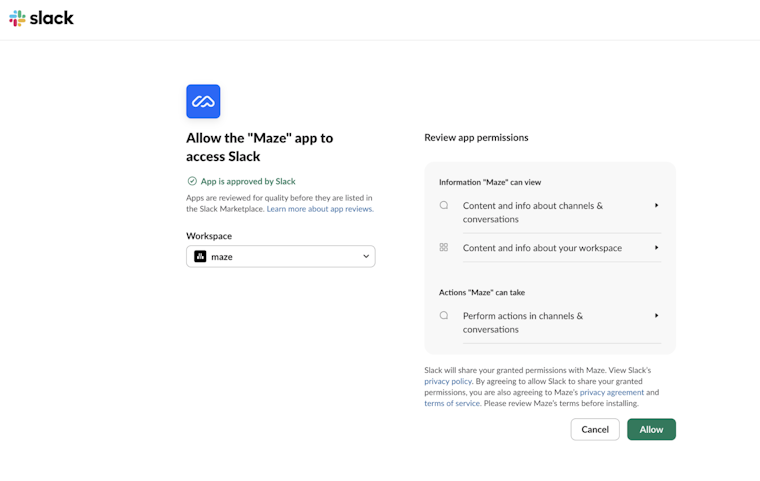
Connecting Maze to Slack
The Slack integration helps research stay visible beyond the Maze workspace. Instead of asking teammates to log in and check for updates, you can bring key study activity straight into the channels where they already work. That makes it easier for product, design, and marketing teams to stay informed and keep research part of everyday decisions.
What Slack notifications can include
- When a study starts collecting responses: Let your team know research is live, so stakeholders can follow progress from the start
- When key milestones are reached: Keep everyone aligned as responses build, especially when teams are waiting for enough data to review patterns or move to the next step
- When results are ready to review: Prompt the right people to jump in as soon as findings are available
This is especially useful for keeping product, design, and marketing teams engaged without asking them to log into Maze.
⚠️ Public channels only. Slack notifications only work with public Slack channels. You can't send updates to private channels or direct messages.
How to connect Slack
Here’s how you can set up Slack notifications for individual projects:
- Open a project you want to connect to Slack
- Open the Maze study inside that project
- Click the gear icon to open Maze Settings
- Scroll to the Integrations section
- Click Connect under ‘Connect to Slack’
- Sign in to Slack if prompted, then click Allow to authorize Maze
- Go back to Maze Settings and find the Integrations section again
- Select your channel from the ‘Choose Slack channel…’ dropdown
You can enable or disable Slack notifications per study at any time.

Other integrations to consider
Maze integrates with many tools teams already use, including:
- Design tools like Figma and AI-prototyping tools
- Video conferencing tools like Google Meet
- Scheduling tools like Outlook
- And more
You don’t need to connect everything on day one. Start with Slack, then layer in other integrations as your research practice matures.
Up next: Building an unmoderated study
With your setup complete, we’ll move on to building your first unmoderated study in Maze. In the next chapter, we explore the different block types that Maze supports—including tasks, questions, and AI-powered blocks—so you can design studies that improve user experience and drive optimization across your product.